Wednesday 10 December 2008

October Image Part Three

This is the third part of the Creation of the October Image. To create the body shape that will go under the Cloth I used Cylinders and Boxes that I then modified and placed them into the correct position. I had to create a rough look of a body to make the scene look more realistic and for the sheet to be placed over it. I then placed the body onto the operating table ready for the sheet to placed over it. I didn't need any textures on the body because it wont be seen.


The next stage was to create the sheet that is going to be placed over the top of the body. I had to first create a rectangle that will become the sheet and convert to a poly. I then had to use the modifier called 'Garment Maker'. This is located in the drop down menu in the Modifier panel. This tool converts the rectangle into a material and allows the modifier 'Cloth' to be added to the rectangle. The 'Cloth' modifier is located in the same drop-down menu as the 'Garment Maker'. Once the 'Cloth' option has been the selected a menu panel appears at the right hand of the screen. This panel is used to create the cloth animation which will give the sheet its final look. Next you have to click on the 'Object Properties' Button which will load up a pop-up Menu called 'Object Properties'. You then have to add the body and the table which the sheet will lay over into the 'Objects in Simulation'. You then have to highlight all of the objects in this menu apart from the Sheet (Rectangle) and then click on the option 'Collision Object' which is a little check box. The next thing to do is to click on the sheet and then click on the check box named 'Cloth' located at the top of the screen. Now you have to click on OK and then click the button named 'Simulate Local'. The Simulation will now run and the Cloth will be placed over the body and the operating table.


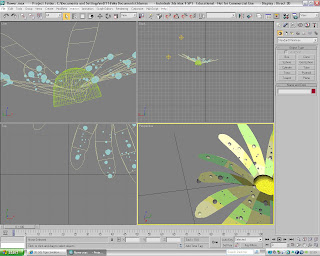
This is what the cloth looked like when the animation was complete. The addition of the body under a cloth really adds to the mood of the image and creates a focal point for the audience observing it.


I then added some lighting to the scene to give the scene more atmosphere. I used a 'Target spot' for the light coming through the door way and I have also used some Omni lights to the scene. The picture below is the final rendered image of the October Image. All that is needed now is to transfer it into to photoshop and then add the finishing touches.

Tuesday 9 December 2008

October Image Part 2

This is the second part of the creation of the October Image. The next step is to create the top of the table. I started off by creating a box which will be the main body of the tabletop. I made sure that when I created it I used lots of segments. I used about 15 for the each of the hieghts, Length and the width. This will then allow me to get the shape that I wanted for the table top. To get the curved edge I highlighted the edge of the the table and used the tool 'TurboSmooth'. This smoothed the edge to get the look that I wanted.


The next step was to add the texture to the table to give it more realism. I first found some textures off of the Internet and then transfered them into Adobe Photoshop. I then modifyed the Bitmap image and I then imported it into the Material Editor in 3Ds Max. I then transfered the material onto the Shapes that make up the Table. The Shader Basic Parameters that I used for the table materials was 'Metal'. This made the material look more like metal which was the look I was after.


The next stage of the October Image is to create the operating table where the body will be placed. The Body will have a sheet placed over it so that doesnt need to be much detail implemented into the table. To create the table I used the same technique that I used for the other table. I used cylinders for the legs and boxes for the actual surgery tabletop. The one difference of the operating table was to create wheels. I used cylinders that were rotatated and resized amd then moved into position. The wheels give the table more detail and make the image more interesting. I then added the same textures to the operating table as I have done for the other table.


The next stage of the Image is to create the tools that will be placed onto the table. I created them using Splines which I then extruded the shapes. This made them look more like 3D images and added to the dark feeling of the picture. I had some trouble when I created the handle of the Saw. To create the handle I first create the outline by using the spline 'Line' tool. I then converted it into a 'Poly' and then extruded the face. This made it look more 3D. The next step was to create the whole in the handle. To do this I had to use the tool 'ProBoolean' to cut out the shape. I first create a sphere and then placed inside the handle where I wanted the hole to be. I then selected the 'ProBoolean' tool located in the Compound Objects Menu at the right hand of the screen. I then Subtracted the Sphere from the Handle and this gave me the shape that I wanted. I then had to add the textures to the tools to make them look more realistic and make them look part of the scene.


This is what the tools look like when they are fully rendered and with the Textures.

October Image Part One

This is the first part of the October Image Creation. October Image is a scene of a surgery that has been made scary. It is meant to look like some kind of scene from a horror movie. The first stage was to set the background color. For this image I will use the background color white. This will act as the color that appears through the doorway in the picture.


The next stage is to create the floor. I have used a box for the floor which I have resized to give the shape that I want. To make the floor look more realistic and more in charcter with scene I added a Cracked Concrete texture. I found this image on the internet and then imported it into my Material editor. To give the floor texture more depth I have also add the same texture onto the bump map which is located in the maps section of the Material editor. I then dragged the concrete texture onto the floor. When I intially did this the texture didnt give me the look that I was after. I had to attach a 'UVW map' to the floor which allowed me to modify the look of the texture.


The next stage was to add walls to the Surgery room. To create the walls I used the box creation tool which is located in the Create menu at the right hand of the screen. I then had to create the doorway which is going to be one of the main focal points of the scene. To create this door I had to use the tool called 'ProBoolean'. I had to first create a Box that is the shape of the doorway and then place it so that it was inside the wall. The box had to be wider than the wall to ensure the 'ProBoolean' tool would cut away the width of the wall. I then selected the wall and then went to the 'create' panel and I selected the 'Compound Objects' option from the drop-down menu. I then selected the 'Pro Boolean' option and then from the menu at the right hand of the screen clicked the check box named 'Subtraction'. I then clicked on the button 'Start Picking' and then selected the box. The box has now been subtracted from the wall. This gave me the look that I was looking for.


The next stage is to add texture to the walls. To do this I found an image of the internet and then edited in Adobe Photoshop. I then imported it into the Material Editor. I also used the same map for the bump map to give the walls more texture and the image more depth.


The next part of the creation of the October image is to create the metal table were the surgical instruments will be placed. I started out by creating the base of the table. To do this I used cylinders and then placed them to make the table look like it has a structure. I then created a box and then placed midway up the table and between the two sets of legs.


Final Summer Days Picnic Image

This is the Final Summers Day Picnic image
Summers Day Pinic Part Three

This is part three of the creation of the Summers Day Picnic 3D image for the month of July. All that needs to be created to finish the 3D image is the photos which will be scattered across the table. To create the photo I had to first select the create box tool and then I drew the photo onto the stage. I made this part white so that it looked like the outside of a poloriod photo. I then rotated and placed it onto the table. The placing of the photo was crucial to the overall look of the image. I didnt want the image to look too staged.


The next step was create the actual photo part of the photo. To do this I used a box which is slightly raised above the box which is used for the white part of the photo. I then duplictated the two boxes and then placed the clones onto the table next to the original. I rotated them so they looked scattered and not purposefully placed. To add images to boxes I first had to import the images into the material editor. The images were taken from the internet and then they were modifyed using the program Adobe Photoshop. The Material maps were then dragged onto the relevant boxes to give the look of real photos.


This is what the final rsult looks like with all of the maps added to give it the final look. All is needed now is to transfer this final image into Adobe Photoshop and add the finishing touches.

Summers Day Picnic Part 2


This is the second part of the creation of the Summers Day Picnic. I have now placed the glass onto the table and ensured that the table top texture looks correct. The glass will reflect the table top and the environment and make it look more realistic. The glass should reflect everything that is placed into the scene.


The next stage of the 3D image is to create the main body of the camara. To do this I will use a box and use the modifyer called 'TurboSmooth'. The 'TurboSmooth' modifyer can be found in the modiyer drop-down menu at the right hand of the screen. To ensure that the 'TurboSmooth' modifyer works correctly the box will have to have about 15 segments for the height, width and the length. As soon as the 'TurboSmooth' option has been clicked on the boxes edges will be smoothed. This makes the box look more realistic.


The next part was to create a box which will become the Flash. This will add more realistic look to the light. I first drew a box and then rotated it and placed it onto the main body of the camara. I then added the same texture to the Camara Flash as I did to the glass. This gave it that glass look.


I then had to create the main lense of the Camara. To do the first ring of the lense I used a cone which I then cut of the uppermost part. This gave me the effect that I wanted, which was a sloped beginning.


I then added the rest of the rings of the lense to the Camara. The rest of the rings where created using cylinders which resized and placed into position. I then added other cylinders onto the top of the camara to make them look like buttons and dials. This added to the Camara realism and look. To get the look of the dials and other aspects of the camara I used a picture a real camara obtained from the internet and then tried to copy it as much as possible. This hopefully made the final Camara look realistic and proffesional looking.

Summers Day Picnic Part 1

This is the first part of the creation of the 3D image Summers Day Picnic. I first started off opening up Autodesk 3Ds Max. I then set the background image called 'grass.bmp' which I had edited using the program Adobe Photoshop CS2. Setting the background image will help me create the image by being a starting point from which I can work from. The next step was to create a Cylinder to be the tabletop. I will create the other images later on in the development process. To create the cylinder I had to go to the 'create' menu and then selecting the cylinder option. With this selected I then drew the shape onto the stage. I then imported a texture map into the map editor and then dragged that onto the table top. This made it look more realistic and made it look more realistic.


The next stage in the Summers Day Picnic is to create the Glass. To create the glass I need to create a spline line. To do this I had to go to the 'create' menu and then select the spline tab. In this menu I then selected the line tool and drew a rough shape that I wanted. This shape will be used to lathe which will give me the final shape of my glass.


To lathe the line I first converted to the line into a poly. I then went to the modify menu located at the right hand of the screen and then scrolling down to the 'Lathe'. This option lathed the line so that the shape of the glass is created. The next stage of the creation of the glass is to add the material to make it look more like glass.


To access the material editor you can click on the material editor button which located at the top of the screen. The button looks like four different colour balls. To get the material for the glass I used the 'Phong' shading option and I then changed the Specular level to 250 and the glossiness to 80. This will give the glass a shine and gloss that looks more realistic. I have also added a 'Raytrace' map to the reflection map which will then give the surface of the glass a reflectiveness which resembles real glass.


Monday 8 December 2008

Final Morning Dew Image

This is the final image for the month of May.

Friday 28 November 2008

Morning Dew Part 4

After I had textured and shaped the raindrop I postioned it onto the flower. I then had to duplicate the raindroplet many times and then position them randomly on the petals of the flower. I had to place the droplets so that they were slightly below the surface of the petals to ensure that they didnt look like they were floating on the surface.


I then duplicated the raindrops and placed them around the flower to give the final look to the flower. The next step that I had to do was to create the Butterfly. To do this I first opened up a new document so that it was a bit clearer what I had to do.


To create the Butterfly I had to first select the spline option which is located at the right hand side of the screen in the 'Create' menu. I then drew out the shape of the butterflies wing and then converted it into a poly. I then extrude the middle of the shape slightly to make it look a bit more 3D. I then capped off the other side. I havn't added any texture at this stage of creation.


I then cloned the wing and and then placed it so that it looked like a Butterfly. I then rotated the wing so that it looked more organic. It is beginning to look like a Butterfly. I feel that by adding a Butterfly to the picture it will make the picture look more complete.


The next stage of the Butterfly creation is to create the body. To create the body I used a capsule which I have extruded it slightly to give the shape that I was looking for. To create the capsule I had to first go to the 'Create' menu and then in the drop down menu select the 'Extended Primitives' option. I then choose the Capsule option and then drew the body onto the stage. I re-sized it to make it look more in proportion with the body.


The next stage is to create the Butterfly head. To create the head all I did was select the Blobmesh tool and click onto the stage. This created the rough shape of the head. To select the Blobmesh tool I had to go to the 'Create' menu and then in the drop-down menu I had to select the 'Compound Objects' and then select the Blobmesh tool. I then clicked onto the stage where I wanted the head to go. I then re-sized the Blobmesh and modifyed it so that it looked more organic and realistic. This is the final look to the Butterfly. All that is needed now is to add the textures and materials to make it look like a real Butterfly.


I created the textures for the Butterfly in Adobe Photoshop and I then imported them into the Material editor. I then placed the textures onto the shapes in the picture. The image below is the final look of the Butterfly and all that is needed now is to import it onto the final Morning Dew image.

Monday 24 November 2008

Morning Dew Flower Part 3

This is the thrid part of the flower Morning Dew Flower 3D Image. I started the third part of this image by drawing a sphere on the end of one of the petals. This sphere is going to be one of the rain droplets. I converted the sphere into a poly and then changed the shape of the sphere to make it look more organic and rain drop like. A rain droplet shape could be anything and is quite random so I just shaped it so that it looked organic.


To give the petals some texture and some colour had to use the material editor menu to do this. I first selected the 'Blinn' shader for the


To make the rain droplet texture I had to use the Material editor. I first selected 'Translucent Shader' in the 'Shader Basic Parameters' menu. This will give the rain drop the watery look that I am looking for. I then changed the 'Diffuse' color to a light blue which will give the colour of the water. I tried this first with a white colour and it didnt look quite right. I then changed the 'Specular level' to 72 and the 'Glossiness' to 50. This will give the rain drop a shiny surface. I have also changed the opacity to 42 to make it look see-through. To add a reflection to the surface of the rain drop I have used a 'Raytrace' map to the Reflection option. This is located in the 'Maps' menu. I have then added a map to the 'Refraction' option to refract an image. The image that I used for this is the same as the background. This will make the rain droplets look like they are part of the scene and give the scene realisim. Once I had got the final shape and texture for the rain droplet I then duplicated it quite a few times and then spread them around the flower to make it look like morning dew that had settled on the flower.


Morning Dew Flower Part 2

This is the second stage of the Morning Dew Flower 3D Image. I started this stage by creating a petal. I did this by going to the main menu located at the right of the screen and then clicking on the 'Create' tab. I then clicked on the menu called 'Splines' and selected the option 'Line'. This will allow me to draw a 2D shape using lines. When I clicked on the the 'Line' option a menu appeared below the 'Object Type' menu. I selected the options 'Smooth' in the 'Intial Type' menu and 'Smooth' in the 'Drag Type' menu. This will make the shape that I draw smooth looking and look more organic, which is what I am looking for. I then drew the shape that I wanted on the stage. Once I had done this I right clicked on the object and then converted it into a poly. This will then allow me to modfy it. I then clicked on the 'Vertex' option located in the 'modify' panel and then selected random points around the edge of the petal. I then moved them about to give the shape a more organic and realistic look.


Once I had got the desired shape that I wanted I then duplicated it and then arranged them so that it looked like a flower. I resized the petals so that they looked different. To do this I right clicked on the petal that I wanted to re-size and then scroll down to 'Scale', which allowed me to scale down the size of the petal.


When I had postioned all of the petals and made them look less regimented and then wanted to put a 'Bend' modifyer on them. I wanted them to look more realistic and the Bend option would make the petals to make them look like a more organic shape. To use the Bend option I went to the Modifyer list and then clicked on the drop down menu. I then scrolled down to the 'Bend' modifyer and then a 'Bend parameters' menu will appear. I then tried the different options on this menu to get the desired option that I wanted. I did this to all of the petals on the flower and the nearly final flower image was created. All is needed is to add the Textures and the Butterfly which will be placed on the end of the petal.


Next I added another texture to the flower center make it look more like the flowers in the background image. This will then make the flower look like part of the picture. I also added a speckle map to the 'Filter Color' option. This gave it a more realistic feel to it.


Morning Dew Flower Part 1

I first set the background picture which was called "img_9195". This gave me a reference point to start from and to build my picture. To set the background image I had to go to the 'Rendering' menu located at the top of the screen and then scroll down to 'Environment'. A pop up menu will then appear and I then clicked on the 'Environment map' and then added my own map for the background. After this i created a sphere by going to the 'Create' tab and then clicking on sphere. I then drew my required shape onto the stage.


This is the sphere that was created. This will be used for the center of the flower. It still hasnt been made into its final shape yet. I have also added some 'Omni lights' which will create the lighting for the stage. To create these lights I had to go to the lights option which is located in the main menu at the right of the sreen. I then selected the 'Omni lights' option and clicked on the screen where I wanted them to be placed. I had to be careful not to add to many because where ever you click on the screen an omni light would be placed there.


To create my desired look for the center of the flower I converted the sphere into a poly by right clicking on it and then clicking on 'Convert to..' and then scrolling to 'Convert to poly'. This allows me to modify the shape of the sphere. I first clicked on poly face option and highlighted the bottom half of the sphere. I then deleted it because it wasnt needed. I then selected the top half and then shaped it so it looked more organic and realistic.


This is what the center of the flower looks like after it had been modified. The petals will be created and they will be formed around the outside of the center to give the flower its shape. I then had to make the shape have a bit of texture to make it more realistic so I decided to add a bump map to it. To do this I opened up the 'Material Editor' Menu located at the top of the screen. I then clicked on a circle map and then scrolled down to the 'maps' options. This allows me to add maps to the different elements on the 3D Image. I then choose to add a map that I created using photoshop to the 'Bump map' option. I then changed the amount from 30 to 229. This then gave me the textured that I wanted.

Wednesday 22 October 2008


The final image ideas for the three calendars months will have to unique and be interesting. I have created a sketch of my final design to give me an in look into what the images will finally look like and to see if they meet the given requirements. These are the three design ideas that I have come up with:


  • May: The design for May is to create an image of a close-up of a flower with maybe a bug landing on one of the petals or flying about. The background will contain a blurry image of many of these flowers which will give the perception of perspective. These will also bring more attention to the main flower in these image.

  • July: The design for July is to create an image a table top with a few summer photos, a knocked over cocktail with spilt drink and a camera. The table will be made out of wood and the shadows will be created on it by using one of the lighting tools that we have learnt. I want the Image to have a relaxed feeling so all of the items will be scattered about casually. I also want this image to have an Indy style quality to it.

  • October: The design for October is to create an image of a Hand coming out of the ground clutching for air. The Scene will be a grassy clearing with a few scattered leaves about. I want the atmosphere to be dark and gloomy to give an eerie quality. To obtain this mood I will use lighting sparingly and use the ‘Volume light’ effect to create some fog.
In this weeks tutorial we learnt how to use Lighting to make the images look more realistic and atmospheric. We learnt how to use the lighting tools ‘Target Spots’ and ‘Omni’ lights. These tools are located in the ‘Lights’ tab which can be found by going to the ‘Create’ menu and then clicking on the button that looks like a lamp shining. The Create menu can be found at the right hand of the screen. The ‘Lighting’ menu gives you a lot of options to choose from but the main ones that I’ll be using is the ‘Target Spots’ and the ‘Omni Lights’.

The ‘Target Spot’ tool is a useful option because it allow the user to light up the image and create shadows that make the image look more realistic. There is also an option to change the different kind of light and the one that I found looked the most realistic was the ‘Mental ray shadow map’. This option creates more realistic shadows but it takes up a lot more memory which in turn will make the rendering time a lot slower. This tool allows the user to direct the light in any direction that they want and the amount of light that the light will produce. To allow the image to have shadows you will have to click on the light that you have placed on the scene and then go to the modifier tab. You then have to got the shadows menu and then click on for the shadows to appear. The changes to the modifiers parameters have to be made before you convert the image into an editable poly. If you didn’t make these changes before then it will be hard to gain the desired effect that your after.

The other tool that I used was the Omni lights. This tool allows the user to add as many lights as they like to a scene to gain the effect that they are after. They can place them anywhere on the scene. You can also change the affect that the light has like the ‘Target Spots’ and one of these options is ‘Volume Light’. This option makes the image look more eerie and creates a sort of fog effect.

Tuesday 14 October 2008

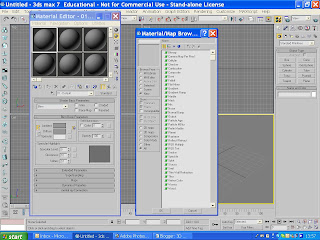
In this weeks tutorial we learnt how to use the ‘Material editor’ function. This option allows the user to add textures, highlights and colours to the 3D image. It can also be used to imitate textures and materials to make the objects seem more realistic. This is a very useful tool to use to complete my final image. To bring up the ‘Material editor’ menu you have to go to the menu bar at the top of the screen and then click on the button that looks like four balls that that are different colours. This is the Material editor tool button.

There are a few different ways in which you can create a texture or material for an object. The user can select a shader from the shader option menu such as ‘Orin-Nayer Blin’ shader or they can choose a ready made option. The ready made option can be found on the menu on the right hand side of the screen. A menu will scroll out with a list of different options and these include a Wood effect or a Planet effect options.

The user can also use their own textures to add to the image to give it a more realistic look and feel. To use your own texture you have to first create the texture. I used the program Adobe Photoshop to create it. I first created a 3cm by 3cm canvas and then I used a paint brush to create a pattern. I then saved the file to be used in 3Ds Max. I then selected a sphere from the boxes and then clicked on the clear box that is situated in the left hand box of called 'Basic Parameters'. I then choose the image that I wanted and then clicked 'OK'. I then dragged the textured sphere onto the relevant object. This option will be very useful when it comes to creating my final 3D images.

Sunday 5 October 2008


This is my Research Board for the month May. I have used all of the Images of things that I incorporate with May. I want to create my final 3D image by using ideas from my Mood and Research Boards.


This is my Mood Board for the month May. I wanted the image to portray the feeling of May which is fresh and optimistic. I used the image of a baby lamb which is what I think of most when I think of springtime. I then used flowers and butterflies to complete the image.

This is my Research Board for the month October. I have tried to research some images that give the same feeling as the Mood Board. I have created a very dark image that mirrors the Mood Board. I will create my final 3D image using these feelings and research to do so.


This is my Mood Board for the month October. I have tried to create a picture that mirrors the my feelings for the month October. I feel that this month is mysterious and spooky and I want to create a 3D image that incorporates these feelings.