Friday 28 November 2008

Morning Dew Part 4

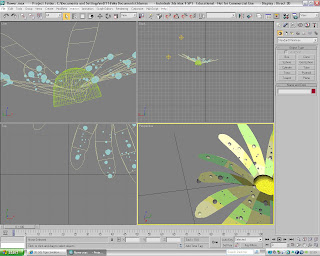
After I had textured and shaped the raindrop I postioned it onto the flower. I then had to duplicate the raindroplet many times and then position them randomly on the petals of the flower. I had to place the droplets so that they were slightly below the surface of the petals to ensure that they didnt look like they were floating on the surface.


I then duplicated the raindrops and placed them around the flower to give the final look to the flower. The next step that I had to do was to create the Butterfly. To do this I first opened up a new document so that it was a bit clearer what I had to do.


To create the Butterfly I had to first select the spline option which is located at the right hand side of the screen in the 'Create' menu. I then drew out the shape of the butterflies wing and then converted it into a poly. I then extrude the middle of the shape slightly to make it look a bit more 3D. I then capped off the other side. I havn't added any texture at this stage of creation.


I then cloned the wing and and then placed it so that it looked like a Butterfly. I then rotated the wing so that it looked more organic. It is beginning to look like a Butterfly. I feel that by adding a Butterfly to the picture it will make the picture look more complete.


The next stage of the Butterfly creation is to create the body. To create the body I used a capsule which I have extruded it slightly to give the shape that I was looking for. To create the capsule I had to first go to the 'Create' menu and then in the drop down menu select the 'Extended Primitives' option. I then choose the Capsule option and then drew the body onto the stage. I re-sized it to make it look more in proportion with the body.


The next stage is to create the Butterfly head. To create the head all I did was select the Blobmesh tool and click onto the stage. This created the rough shape of the head. To select the Blobmesh tool I had to go to the 'Create' menu and then in the drop-down menu I had to select the 'Compound Objects' and then select the Blobmesh tool. I then clicked onto the stage where I wanted the head to go. I then re-sized the Blobmesh and modifyed it so that it looked more organic and realistic. This is the final look to the Butterfly. All that is needed now is to add the textures and materials to make it look like a real Butterfly.


I created the textures for the Butterfly in Adobe Photoshop and I then imported them into the Material editor. I then placed the textures onto the shapes in the picture. The image below is the final look of the Butterfly and all that is needed now is to import it onto the final Morning Dew image.

Monday 24 November 2008

Morning Dew Flower Part 3

This is the thrid part of the flower Morning Dew Flower 3D Image. I started the third part of this image by drawing a sphere on the end of one of the petals. This sphere is going to be one of the rain droplets. I converted the sphere into a poly and then changed the shape of the sphere to make it look more organic and rain drop like. A rain droplet shape could be anything and is quite random so I just shaped it so that it looked organic.


To give the petals some texture and some colour had to use the material editor menu to do this. I first selected the 'Blinn' shader for the


To make the rain droplet texture I had to use the Material editor. I first selected 'Translucent Shader' in the 'Shader Basic Parameters' menu. This will give the rain drop the watery look that I am looking for. I then changed the 'Diffuse' color to a light blue which will give the colour of the water. I tried this first with a white colour and it didnt look quite right. I then changed the 'Specular level' to 72 and the 'Glossiness' to 50. This will give the rain drop a shiny surface. I have also changed the opacity to 42 to make it look see-through. To add a reflection to the surface of the rain drop I have used a 'Raytrace' map to the Reflection option. This is located in the 'Maps' menu. I have then added a map to the 'Refraction' option to refract an image. The image that I used for this is the same as the background. This will make the rain droplets look like they are part of the scene and give the scene realisim. Once I had got the final shape and texture for the rain droplet I then duplicated it quite a few times and then spread them around the flower to make it look like morning dew that had settled on the flower.


Morning Dew Flower Part 2

This is the second stage of the Morning Dew Flower 3D Image. I started this stage by creating a petal. I did this by going to the main menu located at the right of the screen and then clicking on the 'Create' tab. I then clicked on the menu called 'Splines' and selected the option 'Line'. This will allow me to draw a 2D shape using lines. When I clicked on the the 'Line' option a menu appeared below the 'Object Type' menu. I selected the options 'Smooth' in the 'Intial Type' menu and 'Smooth' in the 'Drag Type' menu. This will make the shape that I draw smooth looking and look more organic, which is what I am looking for. I then drew the shape that I wanted on the stage. Once I had done this I right clicked on the object and then converted it into a poly. This will then allow me to modfy it. I then clicked on the 'Vertex' option located in the 'modify' panel and then selected random points around the edge of the petal. I then moved them about to give the shape a more organic and realistic look.


Once I had got the desired shape that I wanted I then duplicated it and then arranged them so that it looked like a flower. I resized the petals so that they looked different. To do this I right clicked on the petal that I wanted to re-size and then scroll down to 'Scale', which allowed me to scale down the size of the petal.


When I had postioned all of the petals and made them look less regimented and then wanted to put a 'Bend' modifyer on them. I wanted them to look more realistic and the Bend option would make the petals to make them look like a more organic shape. To use the Bend option I went to the Modifyer list and then clicked on the drop down menu. I then scrolled down to the 'Bend' modifyer and then a 'Bend parameters' menu will appear. I then tried the different options on this menu to get the desired option that I wanted. I did this to all of the petals on the flower and the nearly final flower image was created. All is needed is to add the Textures and the Butterfly which will be placed on the end of the petal.


Next I added another texture to the flower center make it look more like the flowers in the background image. This will then make the flower look like part of the picture. I also added a speckle map to the 'Filter Color' option. This gave it a more realistic feel to it.


Morning Dew Flower Part 1

I first set the background picture which was called "img_9195". This gave me a reference point to start from and to build my picture. To set the background image I had to go to the 'Rendering' menu located at the top of the screen and then scroll down to 'Environment'. A pop up menu will then appear and I then clicked on the 'Environment map' and then added my own map for the background. After this i created a sphere by going to the 'Create' tab and then clicking on sphere. I then drew my required shape onto the stage.


This is the sphere that was created. This will be used for the center of the flower. It still hasnt been made into its final shape yet. I have also added some 'Omni lights' which will create the lighting for the stage. To create these lights I had to go to the lights option which is located in the main menu at the right of the sreen. I then selected the 'Omni lights' option and clicked on the screen where I wanted them to be placed. I had to be careful not to add to many because where ever you click on the screen an omni light would be placed there.


To create my desired look for the center of the flower I converted the sphere into a poly by right clicking on it and then clicking on 'Convert to..' and then scrolling to 'Convert to poly'. This allows me to modify the shape of the sphere. I first clicked on poly face option and highlighted the bottom half of the sphere. I then deleted it because it wasnt needed. I then selected the top half and then shaped it so it looked more organic and realistic.


This is what the center of the flower looks like after it had been modified. The petals will be created and they will be formed around the outside of the center to give the flower its shape. I then had to make the shape have a bit of texture to make it more realistic so I decided to add a bump map to it. To do this I opened up the 'Material Editor' Menu located at the top of the screen. I then clicked on a circle map and then scrolled down to the 'maps' options. This allows me to add maps to the different elements on the 3D Image. I then choose to add a map that I created using photoshop to the 'Bump map' option. I then changed the amount from 30 to 229. This then gave me the textured that I wanted.